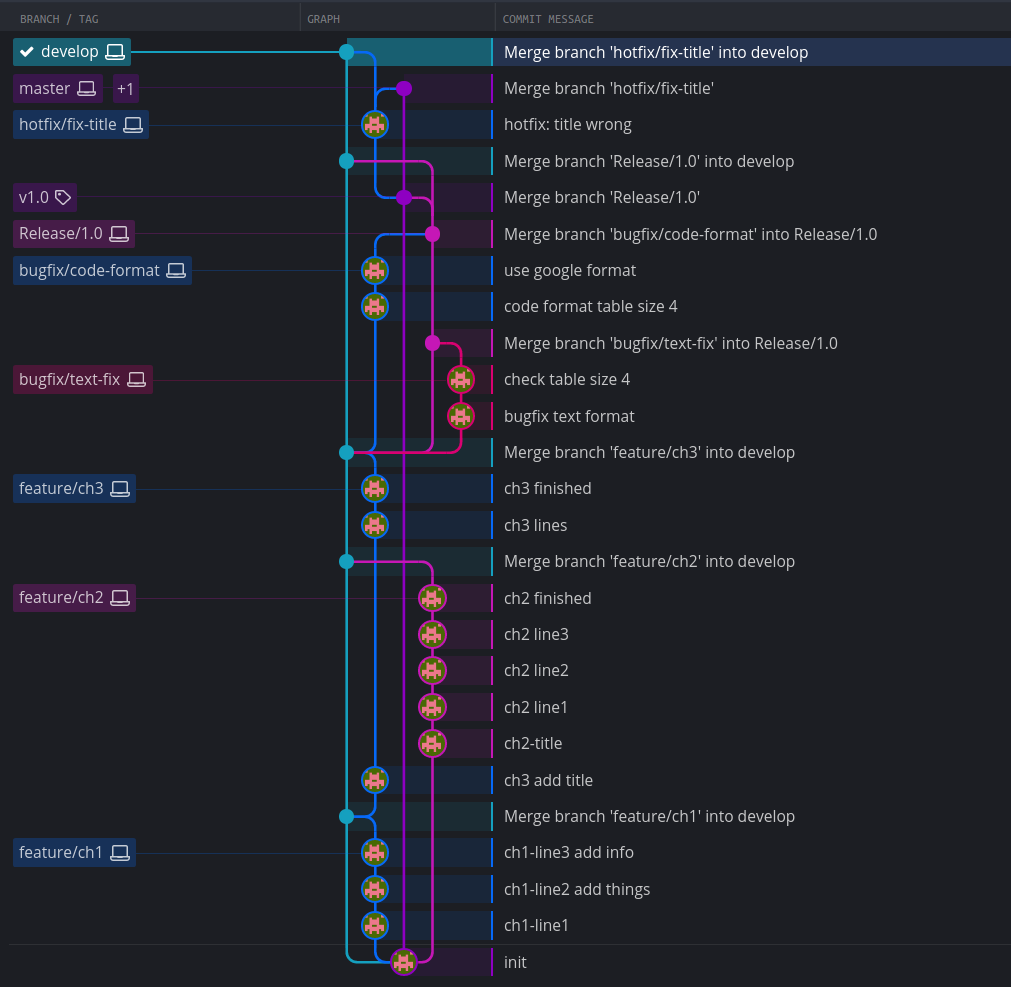
本文简单记录 Git 项目开发流程,包含新feature的开发,bugfix,Release版本发布,以及hotfix流程等。
Created 2020.07.10 by Cong Yu; Last modified: 2021.04.02-V1.0.e -> 2022.08.30-v1.1.0
Contact: windmillyucong@163.com
Copyleft! 2022 Cong Yu. Some rights reserved.
Git Repository Process
References
1. 项目开发流程
1.1 branch的命名
-
git项目主要包括两个分支:master和develop。其他分支比如release,fixbug、feature之类
- master (or main)
- 一个
- 经过多次测试与bugfix,最稳定的branch
- develop
- 一个
- 日常开发
- Release/v…
- 多个
- e.g. Release/v1.3.0
- 每次定版时,由develop抻一个release branch,然后在release branch基础上修bug,稳定后将release合并到master,且将release合并回develop进去下一个开发周期
- feature/…
- 多个
- 日常开发,由develop抻出,开发完成后,再合回develop
- bugfix/…
- 多个
- 日常修bug
- improve/…
- 对之前已经merge的feature的优化与更新
- hotfix/…
- 多个
- 由master抻出来,修bug,然后合并到master和develop
- others 多个
- unit_test/
- unit test开发
- tool/
- 用于开发一些工具
- demo/
- 用于demo的临时branch
- unit_test/
1.2 Process
- 确定开发新的feature之后 从最新的develop branch checkout -b 一个新的分支出来,然后开发
- 完成后push到远程仓库
- 然后去github提交pr,申请review
- 对于review批阅需要更改的地方,在本地修改,然后commit,再次push
- 再次review,被approve之后,在github点merge即可
1
2
3
4
5
6
7
8
9
10
11
git checkout develop
git pull
git checkout -b feature/balabala

# 开发
git commit -m "balabalabala"
git commit -m "balabalabalabala"

# 提交
git push --set-upstream origin feature/balabala
# 然后在github提pr,申请review,合并即可
e.g.

Fig1. 一个使用git小组协同的示例
2. Release Process
2.1 定版流程
e.g. opencv的版本发布:https://github.com/opencv/opencv/releases
Step 1. checkout Release branch
- 由最新的develop 抻 Release branch
- Release branch命名:
- Release/v1.3.0, Release/v1.4.0等
- 通常单号表示内测版,双号表示正式发布版
- 最后一位通常用于hotfix后的定版:Release/v1.4.1 表示 Release/v1.4.0中的重要bug被紧急修复后的及时定版
1
2
3
4
5
6
# pull最新的develop
git checout develop
git pull

# 由develop抻release
git checkout -b Release/<version>
Step 2. pr to master
- 在github上面提pr到master,先挂着不合并,可设定为draft状态
Step 3. bugfix to release
- 针对release测试中反馈的bug,尽快修复
1
2
3
4
5
6
# pull最新的Release
git checkout Release/<ver>
git pull

# 由Release抻bugfix branch
git checkout -b bugfix/
-
修完bug之后,提pr到release分支
-
如有冲突,解决冲突,commit
-
等待其他开发人员review
-
merge到release branch
-
重要bug 的处理
-
对于重要bug,如果同时在当前的develop和release分支出现,需同时提pr合并到release和develop,注意不要引入bugfix外的其他修改
-
Tips: 使用以下方式获得可以同时向两端合并的bugfix分支
1
2
3
4
# 获得共同父结点
git merge-base develop Release/<ver>
# 抻出bugfix分支,commit为上述命令的结果
git checkout -b bugfix/<sth> <commit>
Step 4. update version
-
等release中的bug都已基本解决,开始定版
-
更新代码 config 中的 version信息,然后commit并push
1
2
git checkout Release/<ver>
git pull
修改config
1
2
git commit -m "update version v1.4.0"
git push
-
待CI check通过后,合并到master(选择普通合并Merge Pull Request 即可)
Step 5. tag
- 打tag
- 切换到最新的master分支
- 打tag并push
1
2
3
4
5
6
# pull 最新的master
git checkout master
git pull
# 打tag
git tag <tag_name>
git push origin <tag_name>
Step 6. edit tag info
- 到github上直接编辑上述tag
e.g. opencv的tag:https://github.com/opencv/opencv/tags
- 上传该tag的打包,并填写md5
- md5 的生成
1
2
# 由文件生成md5
$ md5sum <file_name>
- 并填写 change log,根据历史commit 总结一份change log
1
2
3
4
5
6
# 查看历史tag
git tag -l

# 查看上一版至今所有的commit
git log --graph --decorate --first-parent <上一个tag名称>..HEAD
# 总结所有commit内容编写change log
Step 7. pr back to develop
- 由此时间点开始,该release branch就已经没用了
- 将release branch 提 pr 合并回 develop
- 如仍有其他进行中的release branch,需合并到进行中的release branch,而非develop
- 优先级:其他进行中的release branch > develop
- e.g. 预计同期发布两个产品Release/Ch_v2.6.0和Release/En_v2.4.0
- Release/En_v2.4已经定完版,理应合并回develop,此时发现尚有未定完版的Ch_v2.6,则应提pr合并到Release/Ch_v2.6
- 如有冲突,解决冲突,再commit
- 待CI 编译check通过之后,merge到develop(选择普通合并Merge Pull Request)
2.2 Hotfix 流程
Step 1. bugfix
- 定版发布之后,如果发现重大bug,需立即hotfix
- 由 master 抻 hotfix branch
1
git checkout -b hotfix/<v1.4.1>
- 修完bug之后提pr到master
- 并且记得也要提pr到develop
Step 2. release
- 再次打tag
- tag名称,如:上一版为v1.4.0, 则hotfix一版之后通常打tag为v1.4.1
- 再次发布即可
- 结束 :happy:
Contact
Feel free to contact me windmillyucong@163.com anytime for anything.
