opencv使用过程中的一些小卡片笔记,包括常用代码片段,常见代码错误
Created 2021.01.31 by Cong Yu; Last modified: 2021.01.31-v1.0.2
Contact: windmillyucong@163.com
Copyleft! 2022 Cong Yu. Some rights reserved.
OpenCV 笔记卡片
-坐标轴相关
–图像坐标轴
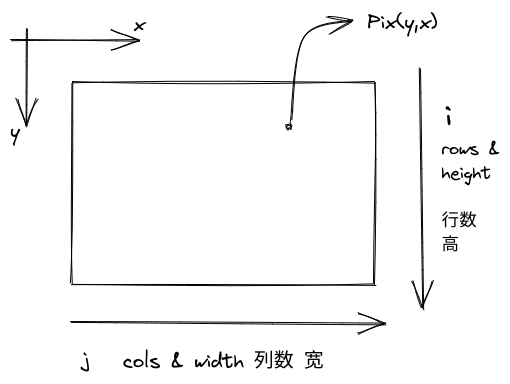
opencv坐标系
i, j, x, y, r, c, w, h 与图像坐标轴相关的变量总是写反?傻傻分不清?总结如下
[[Excalidraw/opencv_pix.excalidraw]]


遍历一张图像时
1
2
3
4
5
6
7
8
9
10
11
for (int r = 0; r < image.rows; ++r) {
  for (int c = 0; c < image.cols; ++c) {
    cv::Vec3b color = image.at<cv::Vec3b>(r, c);  //取出该坐标处的像素值
    if (color[0] < 127 && color[1] < 127 &&  color[2] < 127) {
      image.at<cv::Vec3b>(r, c) = cv::Vec3b(0, 0, 0);  //将背景设置为黑色
      // 等同于
      const auto pix(c, r);
	  cv::line(image, pix, pix, cv::Vec3b(0,0,0));
    }
  }
}
.at访问时是 .at<cv::Vec3b>(r, c)
Point访问时是 Point(c, r)
point的x轴朝向右!!!
1
.at<cv::Vec3b>(r, c) = .at<cv::Vec3b>(Point(c, r))
1
2
3
4
    image.at<cv::Vec3b>(i, j) = cv::Vec3b(0, 0, 0);
	// 等同于
	const auto pix(j, i); // 先j后i
	cv::line(image, pix, pix, cv::Vec3b(0,0,0));
1
2
3
4
	const auto pix;
	cv::line(image, pix, pix, cv::Vec3b(0,0,0));
    // 等同于
    image.at<cv::Vec3b>(pix.y, pix.x) = cv::Vec3b(0, 0, 0);  // 先y后x
–ROI坐标轴
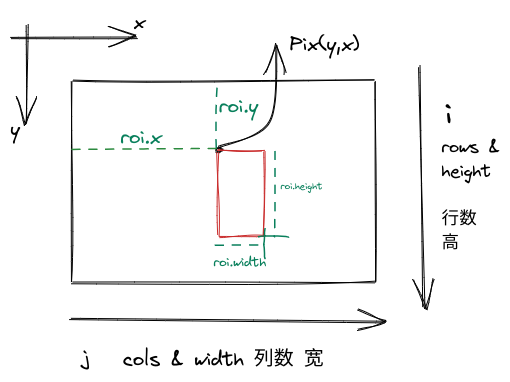
Roi以矩形的方式表达:Rec.x Rec.y Rec.width Rec.height 。
- Rec.x y 指的是图像的像素坐标
- Rec.width Rec.height 指的是矩形的大小,当值为0时,定义一个空的矩形。
限制条件:
\[\begin{aligned} & 0<= roi.x < img.cols \\ & 0<= roi.width < img.cols - roi.x\\ & 0<= roi.y < img.rows \\ & 0<= roi.height < img.rows - roi.y \end{aligned}\]1
2
3
4
5
6
if( 0 <= roi.x && roi.x < img.cols && 0 <= roi.y && roi.y < img.rows && 0 < roi.width && 0 < roi.height ) {
roi.width = std::min(roi.width, img.cols - roi.x);
roi.height = std::min(roi.height, img.rows - roi.y);
} else {
std::cout<<"error"<<std::endl;
}
[[Excalidraw/opencv_pix2.excalidraw]]

-卷积
卷积常用代码片段:
1
2
3
4
5
6
7
8
9
10
11
12
13
14
15
16
17
18
19
20
21
  for (size_t r = 0; r < src.rows; ++r) {
#pragma omp parallel for
    for (size_t c = 0; c < src.cols; ++c) {
      float res = 0.0;
      for (size_t m = 0; m < kernel_mat_->rows; ++m) {
        for (size_t n = 0; n < kernel_mat_->cols; ++n) {
          const float a = kernel_mat_->at<float>(m, n);
          float b;
          const int x = int(r) + (int(m) - int(kernel_mat_->rows / 2));
          const int y = int(c) + (int(n) - int(kernel_mat_->cols / 2));
          if (x < 0 || y < 0 || x > (src.rows - 1) || y > (src.cols - 1)) {
            b = 0.0;
          } else {
            b = src.at<uchar>(x, y);
          }
          res += (a * b);
        }  // end for n
      }    // end for m
      cost_map.at<uchar>(r, c) = res;
    }  // end for c
  }    // end for r
其中,卷积位置的计算:直接卷积核除以2即可
1
2
          const int x = int(r) + (int(m) - int(kernel_mat_->rows / 2));
          const int y = int(c) + (int(n) - int(kernel_mat_->cols / 2));
其中,需要考虑超出边界判断
1
2
          if (x < 0 || y < 0 || x > (src.rows - 1) || y > (src.cols - 1)) {
            b = 0.0;
-多线程imshow
在使用多线程时,imshow()不支持在子线程内显示,但是如果一定需要gui显示,可以设计一个统一的接口将debug image全部接收到主线程内显示。
主线程:
1
2
3
4
5
6
7
8
9
10
11
12
13
14
15
16
17
18
19
20
21
22
23
24
  auto *debug_images =
    new std::unordered_map<std::string, std::shared_ptr<const cv::Mat>>();

  bool running = true;
  while (running) {
	/// balabala

    /// viz
    debug_images->clear();
    useer_class->GetDebugImages(debug_images);
    for (auto i : *debug_images) {
      if (i.first.find("debug_frame") < i.first.size()) {
        cv::imshow(i.first, *i.second);
      }
    }
    key = cv::waitKey(50);
    if (('q' == key) || (27 == key)) {
      running = false;
    }
  }
  delete debug_images;

  return 0;
}
用户类内的子线程接口
1
2
3
4
5
6
7
8
9
10
11
12
13
14
15
16
class UserClass {

  private:
	mutable std::mutex debug_images_mutex_;
	std::unordered_map<std::string, std::shared_ptr<const cv::Mat>> debug_images_;
};

void UserClass::GetDebugImages(
    std::unordered_map<std::string, std::shared_ptr<const cv::Mat>> *image)
    const {
  CHECK(image);
  std::lock_guard<std::mutex> lock(debug_images_mutex_);
  for (const auto &i : debug_images_) {
    (*image)[i.first] = i.second;
  }
}
然后在类内的任何方法里面,将需要传出的图像直接丢入map即可:
1
2
3
4
5
6
7
8
void UserClass::UserFunction(){
	// balabala

	{
	  std::lock_guard<std::mutex> lock(debug_images_mutex_);
	  debug_images_["debug"] = std::make_shared<const cv::Mat>(frame_);
	}
}
Contact
Feel free to contact me windmillyucong@163.com anytime for anything.
